After the trip: a travel photo workflow from phone to album
Back from a trip with 900 photos? Bring them home, fix the time zone, cull the bursts, map the route and keep the best as an album, all in one evening.
On this page
A good travel photo workflow takes one evening: copy everything to your PC, correct the camera's clock, let the software reject the blurry shots and pick the best of each burst, look at the route on a map, then keep the favourites as an album and export a small set to share. firelet.media Gallery does each step on your own computer, without uploading a single photo.
Here's the routine, in the order that saves the most work. The screenshots and steps are from the Windows app.
Start the travel photo workflow: bring everything home
Get every photo from the trip into one place first. Culling half a trip and finding the other half a month later is how albums end up with holes.
From a camera's memory card:
- Insert the card, then click the Imaging tab in the title bar (Ctrl+2) and choose Import.
- Under Import into, press Choose folder… and pick your photo folder. Pictures are filed under it by date, as
yyyy\yyyy-MM-dd. - Select the card under Where from (press Look again if it isn't listed).
- Press See what is new to see how many files are new, how many are already in the library, and the total size.
- Press Import.
Every copy is checked against the original after copying, files already in the library are skipped, and nothing is ever removed from the card. Camera RAW files aren't supported yet and are skipped; the JPEGs your camera wrote alongside them are imported as normal. Supported file formats lists exactly what is imported.
From an Android phone over Wi-Fi: the free firelet.media Gallery companion for Android is coming soon (it isn't on Google Play yet). When it's available, you pair the phone once and it appears under Where from like a card, or you can let the PC copy new photos automatically whenever the phone is on your home Wi-Fi. See how to pair an Android phone. Until then, a phone plugged in by USB should appear as an import source too, or you can add your phone's cloud sync folder with Library → Add a cloud folder.
Fix the time zone
Phones usually set their own clocks. Cameras often don't, so a camera left on home time files every photo hours out, and your phone and camera shots come out of order.
To check, sort the grid by Oldest first and look at a moment you shot on both devices. If the camera's photos sit a few hours away from the phone's, fix them in one go:
- Show only the camera's photos: open Filters (Alt+2), expand Camera and choose it in the Camera list. (Press Read camera data there first if the list is empty.)
- Select them all with Ctrl+A.
- Press Ctrl+Shift+D to open Date and time.
- Choose Move them all by, pick + or −, and enter the hours (and minutes, if the clock was also a little off).
- Press Apply.
The dialog's own hint says it's "for a camera clock that was wrong, or never set to the trip's time zone". The correction is stored in the library and the files are never changed; Back to the file's date undoes it. Photos in the wrong order? How to fix dates covers the other cases.
Cull bursts and near-duplicates
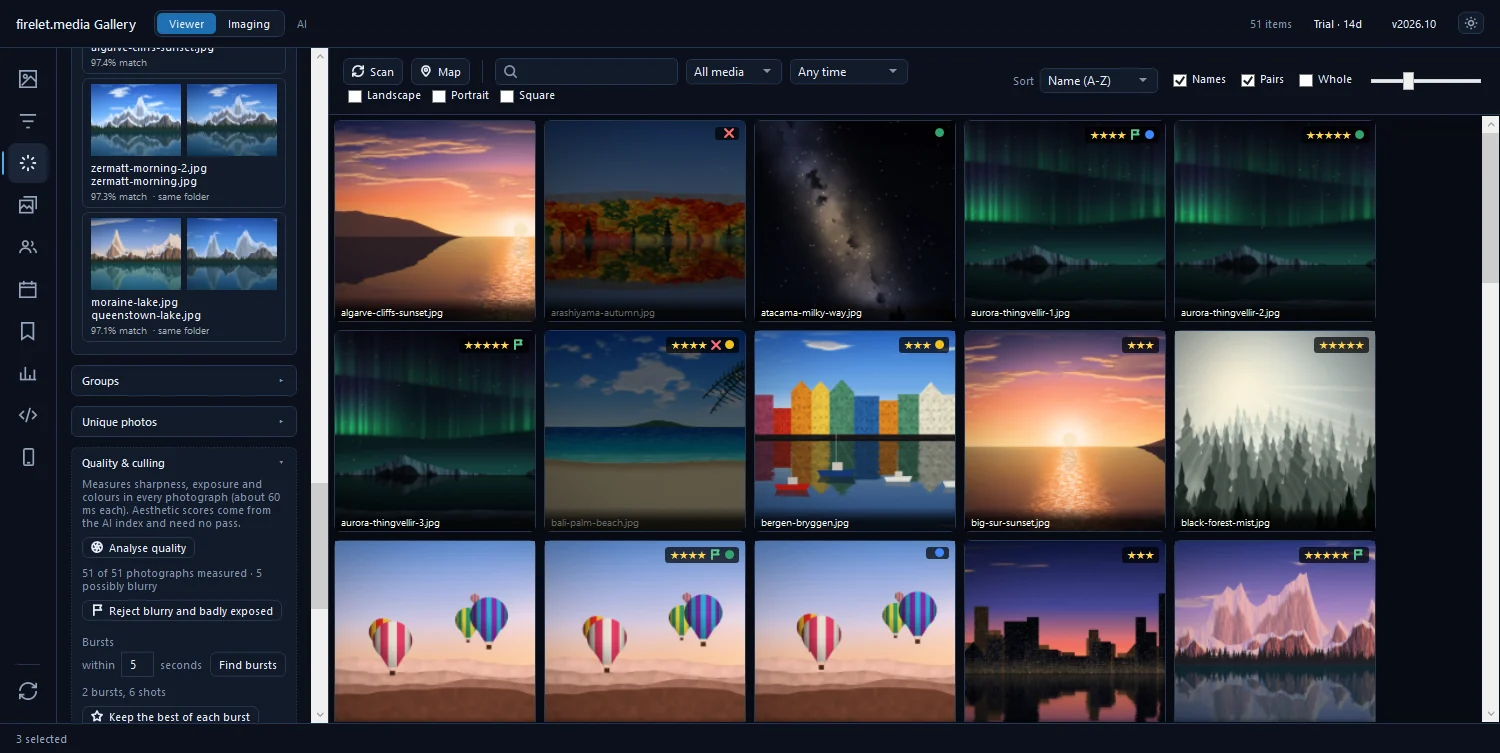
Now shrink the pile. Open the AI panel (Alt+3) and expand Quality & culling:
- Press Analyse quality. It measures sharpness and exposure in every photo, at about 60 ms each.
- Press Reject blurry and badly exposed.
- Leave the burst window at 2 seconds and press Find bursts.
- Press Keep the best of each burst. It picks the sharpest, best-exposed, most aesthetic frame of every burst and rejects the rest.
For near-identical shots that aren't bursts, such as the same view taken twice an hour apart, use the Duplicates section. It needs the AI model (a one-time 438 MB download with Download model) and Index library first, then Scan for duplicates lists look-alike pairs. See how to find and remove duplicate photos.
Then go through the survivors by hand: open the first one, press A so the viewer moves on after each mark, and press P to pick or X to reject.
See the route on the map (Trail)
Press Map on the toolbar. Every photo with GPS data is plotted, and ticking Trail joins them in date order, so the trip draws itself: the drive along the coast, the day you doubled back.

Out of the box the map has no background imagery, only your pins on a plain background. Map tile services restrict use by apps like this and most need an account and a key, so you choose one with Tile provider…. Map says "No map tiles configured" explains the options.
Two more map tools help here. Select area lets you drag a rectangle to filter the grid to one part of the trip. And if you set up a place-name service under Filters → Location → Service…, Look up places adds city and country names you can search for. That sends your photos' coordinates, rounded to about 1 km, to the service you chose, and only when you press the button.
Keep the best as an album
With the rejects out of the way, choose the keepers. Press 5 for the photos you'd put on the wall, 4 for the ones that tell the story, then set Filters → Rating & labels to 4+ stars.
- Select everything shown with Ctrl+A.
- Open Albums & keywords (Alt+4).
- Type a name, such as "Iceland 2023", in the album box and press Enter.
The album is created with the selected photos in it. Albums are lists, not copies, so they take no extra space, and a photo can be in several. For a long trip, right-click the album and choose New album inside… to make one per region or week.
The Calendar panel (Alt+6) can do some of this for you. Under Events, it splits your photos into events wherever there's a gap of more than eight hours or a jump of more than 150 km. Right-click an event and choose Keep as an album.
Share a small set
Nobody wants 900 photos. Pick twenty and send those.
- Open the album and select the photos to share.
- Press Ctrl+E to open Export.
- Choose the Web — 1080 px JPEG, no location preset, or set Long edge to 2048 px for sharper copies.
- Leave With my edits — crop, turn, light and colour ticked so your crops come along.
- Choose a Folder and press Export.
The originals are only read, never changed. Remove the location before sharing keeps your route off other people's phones; how to remove location data before you share explains what it strips.
Finally, copy the trip's folder to a second drive. firelet.media Gallery organises your photos but doesn't back them up, and a trip is one of the few things you can't reshoot.
Questions people ask
Can I see the route I travelled?
Yes. Open the map and tick Trail to join the photos in date order. The pins and the route are drawn on your PC; a background map needs a tile provider you set up.
How do I fix photos taken in another time zone?
Select them, press Ctrl+Shift+D and use Move them all by to shift the time by the right number of hours. The files aren't changed; the correction is kept in the library.
Was this post helpful?
Thank you — that is counted, and nothing else about you is. Still stuck? Ask a person.