My photos are scattered across drives: how to bring them together
Photos spread over old laptops, USB drives and cloud folders? Attach every folder to one offline library, find the duplicates, then tidy at your own pace.

On this page
- Why you end up with photos scattered across multiple drives
- Step 1: attach every folder as it is
- Step 2: add the cloud sync folders already on your PC
- Step 3: find identical copies and near-duplicates
- Step 4: search everything as one library
- Step 5: consolidate later, only if you want to
- When an external drive is unplugged
If you have photos scattered across multiple drives (an old laptop, two USB disks, a OneDrive folder and a memory card in a drawer), you don't have to copy them into one place before you can use them. firelet.media Gallery attaches each folder where it already is, builds one searchable library from all of them and shows you the duplicates. Moving files can come later, or never.
Why you end up with photos scattered across multiple drives
Nobody plans a scattered photo collection. It grows one sensible decision at a time: a new laptop, a backup drive "just in case", a phone that syncs to a cloud folder, a card you never quite emptied. Ten years on, you can't say which drive holds the wedding photos, and some pictures exist three times.
Most people's first instinct is to copy everything into one big folder. That is usually where the project stalls. It takes a weekend, it needs a drive big enough for all of it, and it multiplies the duplicates you were trying to get rid of.
A calmer order works better: index everything where it sits, find the copies, and only then decide whether anything needs to move.
Step 1: attach every folder as it is
Attaching a folder tells the gallery to read it. Nothing is copied or moved, and the files on disk are never changed.
- Plug in the external drives you want to include.
- Open the Library panel with Alt+1.
- Click Attach a folder.
- Pick one or more folders in the "Add a folder to the library" window. You can select several at once.
- Let the scan finish. The status bar shows it counting files, reading their details and saving.
Repeat for each drive. If you attach a folder that sits inside one you already added, or a parent of one, the gallery merges them so nothing is counted twice. Your folders appear under Sources with a count beside each.
For more detail on the Library panel, see how to add your photo folders.
Step 2: add the cloud sync folders already on your PC
Photos in OneDrive, Dropbox, Google Drive for desktop or iCloud Photos usually already have a sync folder on your PC. The gallery can find those folders for you. It reads them from your disk like any other folder, with no sign-in and no connection to the cloud service itself.
- In the Library panel, click Add a cloud folder.
- Tick the folders listed under "Cloud folders on this PC".
- Click Add selected.
Some cloud files are "online only": the name is on your PC but the picture itself is still in the cloud. Those tiles show a cloud badge and no preview, because drawing a preview would download the whole file. If you want previews anyway, tick Download previews for online-only files in the Library panel. The step-by-step guide is how to add OneDrive, Dropbox, Google Drive or iCloud folders.
Step 3: find identical copies and near-duplicates
Now that everything is in one library, the copies become visible. Two tools in the AI panel (Alt+3) handle the two kinds.
Identical copies finds files that are byte-for-byte the same, whatever their name or folder. It needs no AI model, and it never downloads online-only files to compare them.
- Open the Identical copies section of the AI panel.
- Click Find identical copies.
- Click Keep one of each, reject the rest.
The copy that is kept takes the others' stars, keywords and albums. The rest are flagged as rejected, not deleted.
Duplicates finds copies that a checksum would miss: the resized version you emailed, the re-saved export, the phone's compressed copy. It uses the AI index, so it needs the AI model (a one-time 438 MB download with Download model) and a run of Index library first. Then choose a threshold (the default is Near-identical, 0.97) and click Scan for duplicates. Each pair is listed with its match percentage, and clicking one opens it for a closer look.

When you are happy with the choices, open Filters (Alt+2), set Rating & labels to Rejected, select what is shown and press Del. The pictures go to the Recycle Bin after a confirmation.
There is a fuller walk-through in too many duplicate photos? How to find and remove them safely.
Step 4: search everything as one library
This is the moment the scattered collection stops feeling scattered. Every attached folder, on every drive, is now one grid.
- The search box finds words in names, folders, keywords, people, albums, places and text read from the pictures.
- The AI panel finds photos by description, like "birthday cake with candles". See how to find a photo by describing what's in it.
- The date range on the toolbar and the Calendar panel (Alt+6) narrow things down by when they were taken.
- The Show only section of the Library panel limits the grid to the folders you tick. You can also right-click any picture and choose Filter by this folder.
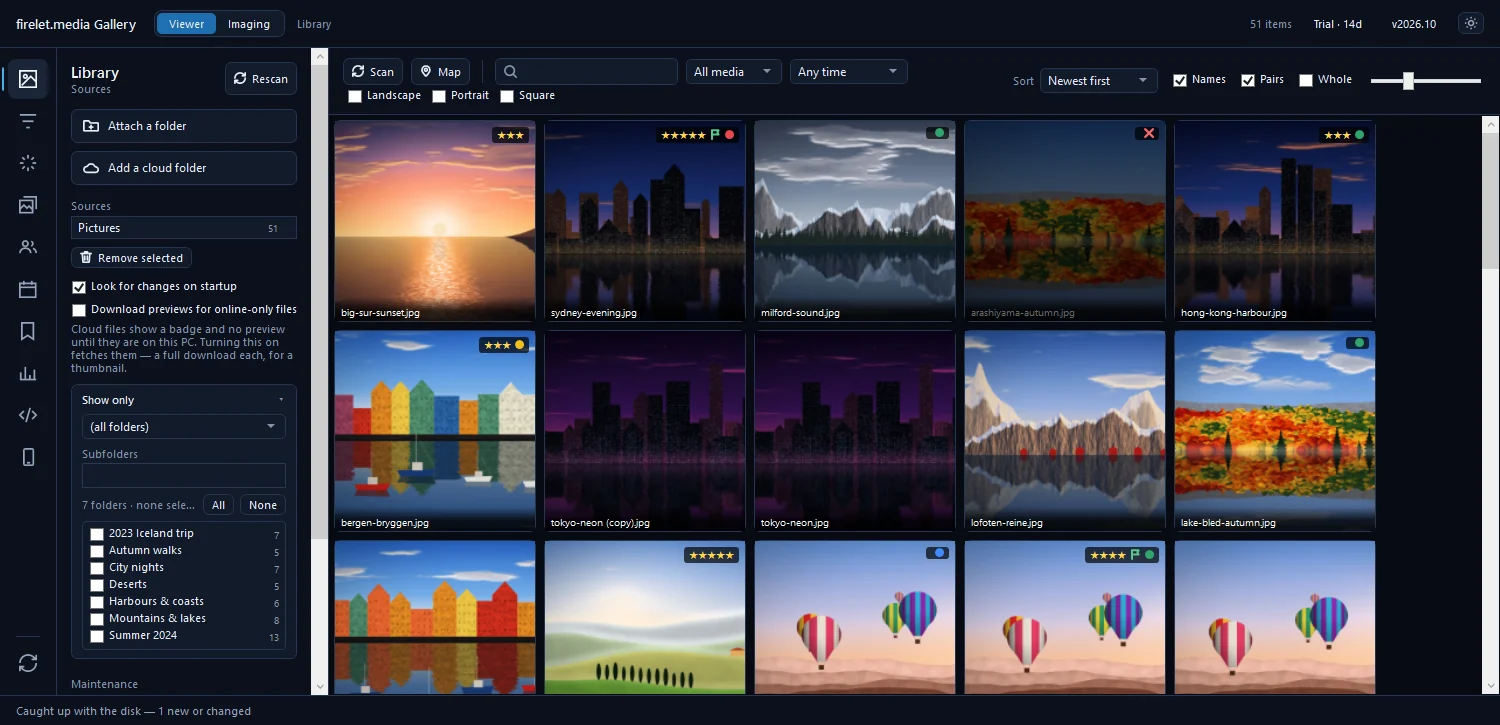
The Statistics panel (Alt+8) has a By source folder breakdown. It is a quick way to see which drive really holds the bulk of your pictures.
Step 5: consolidate later, only if you want to
Plenty of people stop at step 4. The library already behaves like one collection, so the folders don't have to. If you do want everything in one tidy place, do it inside the gallery rather than in File Explorer. A move in the gallery takes the stars, keywords, albums, faces and edits with each file, along with any XMP sidecars. A move in Explorer would leave all of that behind.
- Attach the folder you want everything to live in, if it isn't in the library already. The destination has to be inside a library folder.
- Select the pictures you want to move.
- Right-click and choose Move to, then Choose a folder… or Organise into date folders….
- Pick a layout such as
yyyy\yyyy-MM-ddif you are sorting into date folders. - Check the "Where each picture goes" preview, then confirm.
Do it one drive at a time. Once a drive is empty and backed up elsewhere, you can remove it from the library with Remove selected, which forgets its pictures without touching the files.
When an external drive is unplugged
The gallery doesn't watch folders live. It catches up when it starts (Look for changes on startup is on by default) or when you press Rescan or the toolbar's Scan button.
An unplugged drive doesn't wipe anything. Its pictures keep their place in the library, with their stars, keywords and albums, and you can open them again once the drive is back. After you plug it in, press Rescan to pick up anything added to it in the meantime. Rescans only look at what changed, so they are quick.
Remember that none of this is a backup. The gallery organises the copies you have. It doesn't make new ones, so keep a real backup of every drive that holds photos you care about.
The macOS and Linux builds of firelet.media Gallery are being finished and use the same Library and AI panels. Everything above describes the Windows app, which you can download and try free for 14 days.
Questions people ask
Does adding a folder move or copy my photos?
No. Attaching a folder only indexes it: the files stay where they are, and removing the folder from the library later leaves them on disk.
Can one library include folders on different drives?
Yes. Attach as many folders as you like, from any internal or external drive, and they are browsed and searched together.
Will it find the same photo stored on two drives?
Yes. Identical copies finds byte-for-byte duplicates and Duplicates finds resized or re-saved copies. Nothing is deleted automatically.
Was this post helpful?
Thank you — that is counted, and nothing else about you is. Still stuck? Ask a person.